C.H.I.P – The $9 Computer

I recently received my order of the C.H.I.P. This $9 Linux computer is smaller than the palm of your hand. It comes as a small board with a Linux capable micro-processor and full WiFi and Bluetooth support with USB and analog video. The company also gives add-ons for VGA and HDMI ports that can be attached. What’s cool is that the start up time for the board is less than 5 mins. All you need is a TV, or any monitor with analog input will do, along with a power supply and a USB keyboard and mouse. That’s it. Just plug in the power and it boots up. What’s even cooler is that the board already has a GUI based Linux installation on board. It is enough to browse the web, watch videos and play music.

So, did you getChip?

Running DBase III+ in Ubuntu

Not many use it anymore (because its 2015!). But DOS used to be a wide spread operating system for computers around the world until the late 1990’s. The robust operating system served as a sturdy backbone to earlier versions of Microsoft Windows, until Windows XP became popular. So popular that many users who could not afford to let go of DOS applications earlier are still using it to mediate between the old ways and the new ones. A project with one such user got me back to working with DOS. Well, not exactly. But more like getting DOS to work in the new environments! Of course, there was more than one challenge. My client had DBase III+ DOS program which they needed to use until their new ingenious system was launched. The network had a mixture of Linux and Windows machines and the application was to be run from both. I ended up using DosBox over a VMWare virtual machine mainly since the DOS application did not work very nicely in the virtual machine. My next option was dosemu, a light weight dos emulator for ubuntu. It satisfied all my requirements; it had parallel port and printing support and also supported spooling dos print to USB and network printers. However, after I installed dosemu, i found out that it worked only if the DOS program did not manipulate parallel ports directly. Dbase III+ does. This results in a “printer not ready” error when we try to print from Dbase running in dosemu. Dosemu has an option to let dos control ports directly, however, this limits dbase to printing to parallel port printers only. Hence, I moved to my next option, DosBox. In this blog article, I summarize the steps in getting DBase III+ to work with printing support on Ubuntu 14.04.

Step I – Download Dosbox.

To download and install dosbox from the latest repository –

$ sudo apt-get install dosbox

However, to have printing and parallel port support, we will need the Dosbox megabuild. This can be obtained here. I am using the Megabuild 6 Source code for building in linux.

Step II – Install dependencies and dosbox

Let’s start by downloading the dependencies.

$ sudo apt-get install build-essential automake libsdl-net1.2-dev libsdl-sound1.2-dev libfreetype6 libfreetype6-dev

Next, we download the source code.

$ cd
$ mkdir dosbox_src
$ cd dosbox_src
$ wget "http://source.dosbox.com/mb6/dosbox-mb6.tar.gz"
$ tar -zxvf dosbox-mb6.tar.gz

Great. Now that we have the source code, we need to build it. However, the code won’t compile as is. Its been a while since the code was built and Ubuntu has undergone changes. We need to modify a few files. For each of the following three files –

  1. dosbox-mb6/src/cpu/cpu.cpp
  2. dosbox-mb6/src/dos/dos.cpp
  3. dosbox-mb6/src/ints/ems.cpp

Add the following line, as the first include in the cpp file –

#include <stddef.h>

Next, modify dosbox-mb6/include/dos_inc.h to look as follows –

...
#include "Mem.h"
#endif

#include <stddef.h>

#ifdef _MSC_VER
#pragma pack (1)
#endif
...

If you are compiling on a 64-bit Ubuntu,open the file the file dosbox-mb6/src/cpu/core_dynrec/decoder_basic.h and comment out the code as shown. This part is not required for 32 bit systems.

if (handler-> flags & PFLAG_NOCODE) 
   {/* if (PAGING_ForcePageInit (lin_addr)) 
         {trades = get_tlb_readhandler (lin_addr); 
         if (handler-> flags & PFLAG_HASCODE) 
           {cph = (CodePageHandlerDynRec *) trades; 
           return false;}} 
    */  
       if (handler-> flags & PFLAG_NOCODE) 
         {LOG_MSG ("DYNREC: Can not run code in this page"); 
       cph = 0; 
       return false;}}

All set. Now we simply build the source code

$ cd
$ cd dosbox_src/dosbox-mb6
$ chmod +x autogen.sh
$ sudo ./autogen.sh
$ ./configure
$ make
$ sudo make install

Great. Now we can test drop box by running –

$ dosbox

Step III – Configure DosBox

Now that dosbox is working, we will need to configure dosbox to mount the home folder on start (I assume DBase III+ resides on the Linux Home folder). Open Dosbox and type the following at the prompt –

Z:\> config -writeconf /home/<your username>/dosbox.conf

Close dosbox and open /home/<your username>/dosbox.conf in your text editor. Scroll to the end of the file to the [autoexec] section and change it so it looks like  –

[autoexec]
# Lines in this section will be run at startup.
# You can put your MOUNT lines here.
mount c /home/<your username>
c:

We could also add the following to run dbase directly (assuming that dbase lies on your home folder.

cd dbase
dbase

You could add dosbox to your desktop as an icon and name it Dbase.

Step IV – Printer Support

Open the dosbox.conf file we created in step III. Scroll to the [parallel] section. And change it to look like the following –

[parallel]
...
...
parallel1=printer
parallel2=disabled
parallel3=disabled

Next scroll to the [printer] section and change it to look like the following –

[printer]
...
...
printer=true
dpi=360
width=85
height=110
printoutput=printer
multipage=false
docpath=.
timeout=0

Close the file and save it. That’s it!!! Now when we print from Dbase, the print dialog appears and we can print to any printer in the system.

Getting Started

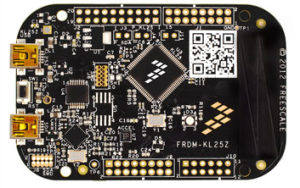
To begin with, lets see what the Freedom Board is made up of. Like any other development board, the Freescale Freedom board is a mini development platform. It comes equipped with the Kinetis L Series KL25 Microcontroller unit. And along with this MCU, we have a few other features like a multi-colored LED, a 3 axis accelerometer and a capacitive touch slider.

OpenSDA

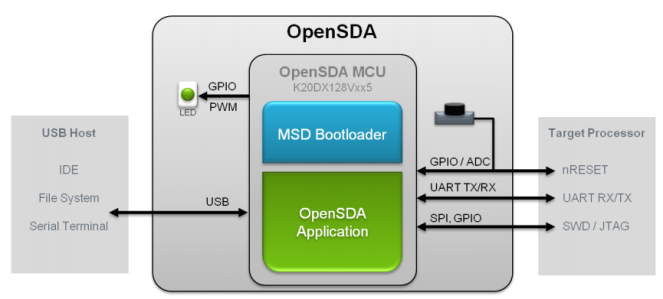
Another important feature of this board is the OpenSDA platform support. OpenSDA is a hardware/software platform. It comes with a secondary Microcontroller unit which provides setup and debug capabilities. It acts as a bridge between the target processor and the Usb Controller. The OpenSDA Hardware consists of a USB host which can be programmed to emulate any device of choice but mostly is used as a virtual serial port. It also consists of a Mass Storage Device or the BootLoader, which provides
a quick and easy mechanism for loading different OpenSDA Applications such as flash programmers, run-control debug interfaces, serial-to-USB converters, and more..

So for most part we will be using this Open SDA platform because it makes debugging easy and writing code easier.

Now that we have an idea of what the hardware looks like, we should get started. In the next section, we will see how to program the OpenSDA Bootloader and load the mbed bootloader on it.

Gem5 Simulator

Gem5 is an open-source processor simulation software. And why am I writing about this? Simply because I happen to work on it as a part of my academics and I could not have struggled more with any other such tool. Gem5 is an incredible open-source tool you can find on http://www.m5sim.org .

Of course the site is always being updated, but, for a first-time learner like me, it came around to be rather tedious to get to know the simulator. The website does give a lot of tutorials but, when it comes to dealing with the simulator, the small errors involved are not discussed. I have hardly even done ten percent of the work however, getting the simulator up and running and dealing with the dependencies took a lot of valuable time. For this purpose, I am documenting the steps I took for getting the GEM5 simulator to run a few primary tests for simulating an ARM processor. The document can be downloaded here

Will upload more on this soon…


The Illusive Eye…

WYSIWYG…What you see is what you get. That’s what the world of technology moves towards today. But is what you see really what it is? Optical illusions are well known for their ability to deceive humans. There are a lot of weird illusions available around the internet.  One among them is Motion Induced Blindness.

It so happens that the human eye cannot perceive slower changes in motion if it is acquainted to a particular speed. There have been studies indicating that when driving at high speeds, the driver cannot see slow moving objects.  The following image is a simulation of the illusion. If you concentrate on the center dot, the other three dots disappear. The order and time of disappearance varies with person and also the size of the dots.

Then, there are the mirages in deserts. A false illusion of seeing water. Though that has been scientificially proven to be reflection of light through water vapour, the question still remains…Is what we see the reality? To view it in a methodical way, the human eye is like a camera. It captures the scene infront of it to focus a two dimensional picture on the retina. It’s the visual perception that makes the scene alive. Our brain analyzes this two dimensional picture as if it were three dimensional. It perceives the depth of the image making it look three dimensional. And this perception is more so learnt by the brain than inherited. If you see a totally unfamiliar object from a large distance distance, it takes some time to discern it. And in that time you focus on the object to discern it. Actually that’s the perception department of your brain at work. By focussing on the object, your brain tries to learn its texture, its depth, its shape and its perceived motion. This process is actually repetative. Your brain teaches itself how to perceive a certain object in future by trying to discern it in the present. To correct the perception, we tend to use our other senses. But what happens when we cant use other senses, how far can we trust our visual perception to correctly interpret the scene? And then again, is what we can only see a reality??

Just the other day, while walking down the streets in the evening, I saw someone standing at the window of the house. At first I neglected it thinking just some one peeping out. But then as I passed the house, something did not seem right. So I simply took another look. Its then that I realised some one had kept a life size poster of a guy in the window. And from a distance, it felt as if someone was standing there peeping outside. So, I had to go closer and take another glance to know the reality.

To sum it all, what you see is not always what you get. Its your brain perceiving the picture your eye sends it. And not always is it very quick and not always it is correct. And then the question remains unanswered….Is what wecan only see a reality? Or is it all just perception!?

Hello world!

To begin with, I am starting a blog. I always had it on my mind to start one but never got a chance to start writing one. And so when I returned to foreign lands and found myself with a month of nothingness, I decided to delve into my mind and get that idea of a blog up and running.

Actually I liked the title wordpress.com gave my first post, so I am keeping it. Interestingly, just recently, I came across a work of art where someone had a licensed a piece of code for “Hello World”. I guess that statement told a lot about me. Yes, I am Computer Engineer and my world revolves a lot around computers. As it happened, I came out of my B-Tech. and got myself exported to far lands in the view of professional betterment. But this country has taught me a lot, not just education, but about everything. And it is these experiences I am willing to share in my blog.

Oh well, that’s it. Short and sweet first post and a wait for the next brain wave to strike…